Monday, August 19, 2013

Fall Cooking Classes at UT's Culinary Institute


I have some awesomely tasty classes coming up at the University of Tennessee's Culinary Institute this September, October and November.  Stop buying and start making your fave foods.  I hope you will join me!  

Homemade Condiments - Sept. 18 - 6 - 8 p.m.
We will create your favorite condiments from scratch -- for a fraction of the cost! Homemade equivalents of expensive ready-made items (without the sugar, fat, and mystery ingredients) can help anyone eat well on a budget. Learn how to make your own delicious fermented ketchup, chipotle mayonnaise, whole-grain mustard, and the "rooster" hot sauce, Sriracha. Everyone will take home a jar of each to enjoy! Maximum: 16 students.


Fall Harvest Dinner - October 23 - 6-8 p.m.
Eating wholesome, seasonal food is a great way to stay healthy and be kind to your budget. You'll create a delicious and easy seasonal dinner with the bounty of local harvests, plus learn how to develop creative meal plans; healthy, low-cost substitutions; the best way to identify good (and bad) grocery deals; useful tips on where to spend your "organic dollars," and much more. On the Menu: Butter Lettuce Wraps stuffed with Roasted Quinoa, Sautéed Local Mushrooms, and Seasonal Vegetables; topped with a dollop of Garlic Hummus, Fresh Pasta with Basil-Toasted Walnut Pesto, and Rustic Apple Tart with Honey Yogurt. Maximum: 16 students.


Pizza Perfection - November 14 - 6-8 p.m.
Pizza lovers unite! You'll never call for delivery again after learning how to make your own delicious and low-cost pizzas. In this hands-on course, you'll create an easy and quick, fool-proof dough; learn tips for shaping and assembling your perfect pie; prepare a variety of toppings that will please the entire family, plus we'll show you some tips on how to bake your masterpiece without all that fancy restaurant equipment. You'll also prepare a classic salad and a favorite Italian sweet to round out the meal. On the Menu: Traditional Neapolitan-style Crust Pizza with two sauces -- Toasted Pine Nut and Basil Pesto and Rustic Marinara Sauce (plus four additional toppings), Classic Caesar salad with Roasted Garlic Herb Croutons, and Bittersweet Chocolate-Chip Biscotti. Maximum: 14 students.


Wednesday, May 22, 2013

Yogurt - Whatcha' Cookin' Wednesday


I know that the thought of making yogurt can be daunting. (YOGURT?  Seriously??) Before I get into details, I just want to say:

You can TOTALLY make this deliciousness:

WITH AN OVEN LIGHT.

(And brains all over the world exploded into tiny pieces....)

When you discover the ease of this recipe you will hesitate to buy store-bought yogurt again. Once you taste it, you will NEVER buy store-bought yogurt again.

It's that easy. It's that good.

This yogurt is tangy and tasty. It's the consistency of a European-style yogurt (a tad thinner than most store-bought brands) but you can strain it to get a firmer product. 

And then there's the savings: 32 oz. of organic, plain yogurt typically runs about $7. (+ tax) in the local mart.  Since it's a big part of our diet we were spending about $30./month for yogurt. We use it as a fat in baking, we stir it into applesauce, use a dollop in smoothies and much more. Now I spend about $3./week or $12./month.That's a savings of nearly $220./year! ON YOGURT.

Besides, it's kind of fun to tell folks, "Yeah, I make my own yogurt."  

(You don't have to tell them how easy it is.)

_________________________________________

'OVEN LIGHT' YOGURT
yields 1 quart (2 pints)

Here's what you need:


-1 quart of milk (cow, raw or pasteurized)

-2 tsp of LIVE yogurt or yogurt starter (yes, it takes a little yogurt to make yogurt the first time you do it...)

-kitchen thermometer (I got mine at Target for about $10.  It allows me to set a timer for when the milk reaches a certain temp.  Neat.)


Here's how you do it:

Turn on oven light and preheat for at least 20 minutes. (Some ovens have a bread proofing setting which is approx. 100°F, you can use that instead.)

In a stockpot, heat milk gently on medium heat, stirring approximately every 10 minutes, until milk is close to a boil – about 180°F. If a skin forms, remove it.

Cover, remove from burner, and allow to cool until the yogurt is comfortable to the touch, 90-110°F.(You can use an ice bath to cool it quickly, but keep an eye on it. Do not let the temp get below 90°.)

Remove one cup of warmed milk and add yogurt starter (live yogurt) to it. Whisk gently, then add milk and starter back into pot.

Pour milk into glass container. (I use a Pyrex bowl with a plastic lid or sometimes quart-sized or pint-sized Mason jars with lids and seals.) Cover.

Place jars/bowl in warmed oven and leave for 12 hours. ***Be sure that the oven light is on for at least 20 minutes PRIOR to placing yogurt in oven in order to achieve 100°F inside the oven.***

After 12 hours, remove yogurt from oven and whisk gently to desired, creamy consistency. Chill 4-6 hours for additional firmness. For extra firm yogurt strain through a *very* fine mesh strainer (also called a chinois strainer) or through several layers of cheesecloth or even a t-shirt. 

Finished yogurt will keep for 1-2 weeks in refrigerator.


Quick tip: You can use your own yogurt as a starter the next time you make this recipe!  Bonus!


Wednesday, May 15, 2013

Taco Seasoning - Whatcha' Cookin' Wednesday


Our family motto is “Don’t Panic.”

We adopted this years ago, around the time our now 7-year old twins started talking. (VERY hilarious to hear 2-year olds chanting, “don’t panic” when hilarity/disaster/confusion was ensuing... Ummm…. Sort of…)

I also have a personal motto: Keep it Simple. This applies to my life and also my cooking style. I like less stuff (and ingredients, when it comes to food) and less hassle. Why buy pre-made processed stuff when you have the ingredients to make it homemade already in your own pantry? This especially applies to pantry staples that only takes 5 minutes to make and/or assemble. 

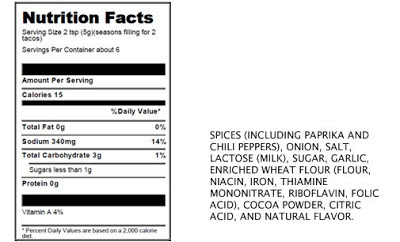
Take taco seasoning. It’s so crazy-easy to make that you’ll kick yourself for not making it sooner. I use it on chicken, beef and pork; sometimes as a rub or maybe just a sprinkle when a little pep is needed in a dish. I also use it when making seasoned taco chicken in the crockpot. And that ingredient list? 8 spices. THAT’S IT.  And… no sugar, milk, flour, citric acid, cocoa or “natural flavors” added.  Yep, that’s what’s in a popular store-bought brand.  

Check it out:


YUCK, right?

Plus, why pay $2. for a small packet of overly-processed, mystery ingredient-laden, store-bought seasoning when you can make your own for pennies on the dollar? Turns out my wallet likes to keep it simple too. 


TACO SEASONING

Here’s what you’ll need:


2 Tbsp Chili powder
¾ tsp Garlic powder
½ tsp Onion powder
½ tsp Red pepper flakes
1 tsp. Smoked or Regular Paprika (I like smoked best but regular will do fine)
3 tsp Cumin
2 tsp Sea salt
½  tsp Black pepper

Combine in bowl and mix together with spoon or fork. Store in airtight container for up to 6 months. (You’ll use it up WAY before then…)


Beautiful. Cheap. SIMPLE.

Friday, May 3, 2013

Fox 5 News features Affordably Organic!


Check it out!

Atlanta News, Weather, Traffic, and Sports | FOX 5


CLick HERE for the link! 


Wylde Center class in Atlanta this June

Do you want to learn more about eating well and organically on a budget? Take my class at the Wylde Center this June!

Join me in Decatur, GA at the Wylde Center (formerly the Oakhurst Community Garden)for my Affordably Organic: Feeding the Whole Family class on Saturday, June 8 from 10 a.m. - 12 p.m.   

I'll show my methods for:


  • easy meal planning 
  • sourcing out and eating seasonal foods
  • pantry must-haves 
  • coupon hunting
  • budget tips
  • identifying good (and bad) grocery deals 


Additionally, I'll share easy, high-nutrition, low-cost, family-friendly recipes. This class usually sells out quickly so reserve your spot now. 

The cost is $15./ Wylde Center Members;  $20./Non-Members.

Sign up here!  Or call the Wylde Center for more info: (404) 371-1920


Wednesday, May 1, 2013

Ranch Dressing - Whatcha' Cookin' Wednesday


This “living organically on a budget" thing can be daunting, right?  I mean, who has the TIME to figure out what we should and should not be eating organically, how to get the best deals, where to find all those “easy” DIY recipes, finding the time to make all those recipes and on and on and on…

I get it.

I didn’t adopt this lifestyle overnight. It takes some time to figure it all out. Don't beat yourself up.

One of the things that can make the journey/transition to eating organically for less much less daunting is to start small. Every week or so substitute a homemade item for something ready-made, processed and/or store-bought. Salad dressing is a good place to start.

I searched high and low but couldn’t find a tasty, inexpensive, organic Ranch dressing that had less than 12 ingredients and didn’t contain sugar. (Seriously, $5.+ for a bottle of dressing?!? And why the heck does contain sugar?) And that favorite, really well-known name brand you see on the grocery? It has 17 ingredients. (shudder)

So, I made my own. And it's pretty dang good. Plus, it's way better for your body and wallet. And sanity. You can totally do this. 


Ranch Dressing
yields approx. one pint

½ c. organic mayonnaise
½ c. organic, plain yogurt
¾ c. organic sour cream
1Tbsp. red wine vinegar
½ tsp. dried onion powder
1-2 cloves of crushed fresh garlic (or use ¼ tsp. powdered garlic)
¼ tsp. dried parsley
¼ tsp. dried dill (can also use fresh)
salt and pepper to taste

Whisk together all ingredients.  (Yep, it’s that easy.)  

Store in air-tight jar in fridge for 2-3 weeks.